
If you fancy preordering Kill Team Salvation, then why not do so via one of our Element Games links? Not only will you save Vs RRP, but you’ll also help us out!
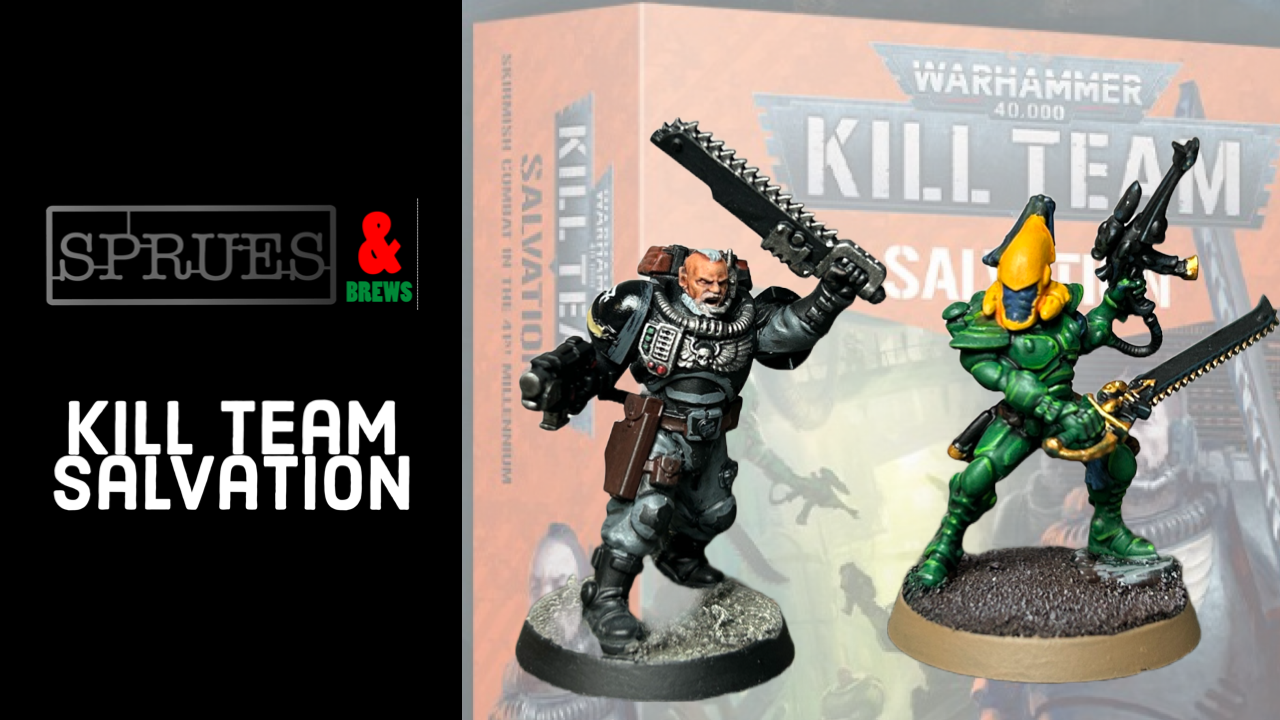
In what feels like an age, Warhammer 40,000 Kill Team Salvation is finally here.
Our thanks to Games Workshop for sending us a copy to unbox and review for you folks!
Following on from the Gallowdark, Salvation brings us a different environment to do battle in.
In this particular box we have two new Kill Teams. The Blades of Khaine (in this box represented by brand new plastic Striking Scorpions) and the Space Marine Scouts. You also get a Salvation book, cards, tokens and some scatter scenery. More on those soon.


Before we head into this review properly, why not take a moment and watch the full unboxing of Salvation in the video below:
Now without further ado, let’s get stuck in:
The Models
First and foremost, lets check out the models.


For Space Marine fans we have the brand new plastic Scouts. These have been a long time coming and are fantastic models. You get two identical sets of sprues, meaning for example you could two squads of Scouts, or one 10 man unit. This also means you get two of every special weapon (the Heavy Bolter, Missile Launcher and Sniper). Theirs a variety of heads too, and optional packs to sit on top of the backpack.
They were great fun to assemble and paint. I managed to get 4 done in time for this review going live, which you can see below, however I’ll be cracking on with the rest of the team as soon as I can.


For Aeldari fans you’ve finally got some brand new plastic Striking Scorpions. Gradually all the Aspects are getting plastic minis, with only Swooping Hawks and Warp Spiders left to go (I think? Never really been a fan of those with pointy ears…).
I say that…these models are gorgeous, and even had me thinking of picking these up when they go on general sale. You’ve got a variety of poses and heads, including heads for Ynnarri fans. The Exarch in particular has a number of options. Jay enjoyed building and painting these, and managed to get three done, as you can see below.


He’s also kindly handed over his original Scorpions to stand side by side.


At this point it’s worth mentioning that you get cards for each of your fighters and cards for your abilities in this box, which is really handy for when you are playing games.
Salvation Campaign Book
And so we move on to the next biggest part of the box, the Salvation book.
This can really be split into 4 sections. The background (including fluff on both Kill Teams and of course lots of stories regarding where this latest season of Kill Team is set, Bheta-Decima), the full rules for using the Scouts and Scorpions (as well as other Aspects, which again we’ll come to soon) and then on to Campaign rules and scenarios on Bheta-Decima.
The Background
The Gallowdark is no more. It’s now a wreck scattered in orbit of the planet. Bheta-Decima is, shall we say, a very watery planet, scattered with mechanicum forges and walkways perilous spread out across the rough seas of the planet.
What this means is we have a new way to play Kill Team. Octarius / Sector Mechanicus was more of a traditional board style, whilst Gallowdark had us battling in small confined corridors and rooms. Salvation / Bheta-Decima is all about walkways and platforms, with a mixture of open spaces and cover. It’s a really interesting way to play Kill Team, which I’m really looking forward to trying out ASAP.
Theirs some really good stories and background in here, which is par for the course recently, as I’ve found the writing in these campaign books / Codexes to have improved.
We also have lots of background info for the two Kill Teams, and of course the Aeldari and Space Marines. As we get in a lot of Kill Team books theirs also a fair amount of narrative flavour, including some really good name generators (I love a name generator!). Again, some great reading material.
Scout Squad Kill Team
So, we move into what a lot of you will be here for, the Kill Team rules.
The Scout Kill Team, as you may imagine, has the Infiltration / Recon Archetypes. A Kill Team comprises of 9 (yes, 9!) members, which can be made up of the following:
- Sergeant (Compulsary)
- Heavy Gunner (Heavy Bolter)
- Heavy Gunner (Missile Launcher)
- Hunter
- Sniper
- Tracker
- Warrior (which has the option of either Shotgun, Boltgun or Bolt Pistol and Combat Blade).
Aside from Warrior types, you can only select one of each of the list above, so you’ll only ever be able to have one Heavy Bolter, as an example, but at least you can take a Heavy Bolter AND Missile Launcher.
You’ve got 4 unique Tac Ops, which as you may imagine lean in to what Scouts are all about, being sneaky and jumping out of the shadows. Nothing shows this off more than the general ability for the Scouts, Forward Scouting.
To try and summarise, at the end of the Set Up Operatives step you can select and resolve up to 5 Forward Scouting options. Theirs 8 options in total, and each one has a number next to it. This number shows how many times you can activate that option.
I’ll give you a few examples:
- Reploy (5): This ability allows you to change the set up of one of your operatives that is wholly within your dropzone. The 5 means you can do this 5 times.
- Diversion (1): Can only be used once, but it allows you to select one enemy operative. This subtracts 1 from its APL for the battle. This could REALLY hamper your opponents plans.
- Devise Plan (1): This one is nice and simple, gain a CP!
- Booby Trap (1): As the name suggests, this one allows you to place a Booby Trap that, on a 4+ deals Mortal Wounds to however moves in range of it.
You’ve then got four thematic Strategic Ploys and four Tactical Ploys. You’ve got abilities here to attack out of Conceal, free Dash actions, re-rolls and…one of my favourites, Astartes Training. It costs a CP but allows an Operative to perform two Shoot or Fight actions, so long as the Operative has a shotgun, Bolt Pistol, Boltgun or Heavy Bolter.
We then have the datacards and abilities. Now you can check these out in the images below for a closer look, or within the unboxing video towards the top of the article, but to summarize Scouts move 3, have an APL of 2 (aside from the Sarge, who has 3), DF 3, 4+ Save and 10 wounds (11 on the Sarge).
Theirs some really fun equipment you can obtain, ranging from Extra Blades (have to pick an Operative with a Combat Blade, but then gains the Balanced special rule), Climbing Equipment (for easier traversing of scenery) and Smoke Grenades (allowing you to Obscure your Operatives).
Again, like with all Kill Teams, you then have some unique Spec Ops content, including Battle Honours, Rare Equipment and Requisitions.
They seem really fun to play with, although maybe tricky to master. You are going to want to take advantage of those abilities to get extra movement through Dashes and Climbing. You probably want to avoid combat, aside from with your Sergeant and any Operatives with Combat Blades.
Blades of Khaine Kill Team
We now move on to the Xenos Scum Aeldari, with quite a unique Kill Team.
So how do you make up this Kill Team? Well…you can pick and choose from three Aspects (all happen to be the Aspects in plastic!), Dire Avengers, Howling Banshees and Striking Scorpions. Your leader is an Exarch, who can be from any of those three Aspects.
You then have 7 other Operatives. Let’s check out the full runthrough of the setup of the team.
- Exarch
- 7 Operatives, in any combination, from any of the above three Aspects.
Well…that was easy…
Because of the unique layout of the Kill Team, the book then goes on to talk about Archetypes. You can use Seek & Destroy archetype or an archetype determined by the most common Aspect keyword of your operatives:
- Dire Avenger: Security
- Howling Banshee: Recon
- Striking Scorpion: Infiltration
Now you may be thinking, that sort of sucks that you don’t have a wide variety of Operatives or Specialisms. Well, this Kill Team has a little way around that, which we will come to shortly.
The Blades of Khaine (which for the second time I nearly typed Blades of Khorne…) have three Tac Ops, two of which require you to work in tandem with your three different Aspects (Aspect Warfare for example scores when a Dire Avenger, Striking Scorpion and Howling Banshee inflict damage in the same turn) whilst the third requires the use of 5 Operatives within the same Aspect in a turn.
Moving on you then have 4 Strategic Ploys and 4 Tactical Ploys, all leaning in to how you are going to be playing with your Aspect Warriors. I’ve picked out a few of my favourites:
- Bladewind: For a CP you can make one of your Operatives perform a Fight action twice. You cannot choose the Exarch, however.
- Fading Light: Again, for just 1CP, you can use the Falling Back action for one less action point (to a minimum of 0CP of course)
- Eminent Grace: You gain triangle movement on one of your Operatives and can treat it as practically a flying ghost, as they can move around, across and over other friendly Operatives (they just cannot finish on top of them)
The general Ability for the Blades of Khaine is cool. Each Aspect has a page of Special techniques, of which you can use so long as you have at least one model from that Aspect in your team. We’ll go through them in a moment, however these are the general ‘rules’ for said abilities:
- You cannot use more than one technique per turn
- You cannot use each technique more than once per Turning Point.
- If every Blades of Khaine Operative selected for deployment has the same Aspect keyword, you cannot use each technique more than twice per Turning Point instead. Say for example if you just took Striking Scorpions.
The datasheets are broken down by Aspect, and starts with the Dire Avengers. You have the datasheets for both the Exarch and the standard ‘Warrior’. Again, you may want to watch the video back or check out the images for the full stats, however one thing I noticed is that both had an APL of 3, which is cool, and they both ignore the Ballistic Skill modifier for firing Overwatch.
You then have the page of techniques for the Dire Avengers. These don’t cost anything to activate, aside from the rules we listed earlier. Theirs 5 of them, but I’ve picked out a couple of my favourites:
- Death of a Thousand Blades: Basically you can get to Shoot twice, but the second shot must be against a different target within circle of the original target.
- Racing Heat of the Dying Flame: You can use this on a Operative that is injured and/or have had their APL negatively modified. Until the start of the next activation for that Operative you can ignore those modifiers and the Operative cannot be injured,
We then go on to the Howling Banshees, again opening with the datasheets (these ladies worsen the enemy Operatives in combat by 1 thanks to the Banshee masks!).
Again, I’ve picked out a few flavoursome abilities that you can call up:
- Rain of Tears: After a Howling Banshee scores a critical hit you can immediately perform a free Dash or Fall Back action up to square movement. You can also act as if you have the Fly keyword as well, representing your Banshee backflipping on to a ledge or something!
- Shriek-That-Kills: This is an alternative shooting attack which has 6 attacks, hits on a 3+, does Damage 1/2 but importantly has hexagon range, Indirect, No Cover and Torrent,
Finally for this section we have the datasheets for the models in this box, the Striking Scorpions. They have the same statline, however what is cool with these folks is that thanks to the Mandiblasters, each time your Scorpion fights at the end of the Select Valid Targets step of combat, the target suffers 2 mortal wound.
And of course, we have a number of special techniques for the Striking Scorpions:
- Patient Stalk, Sudden Blow: You can use this on a Scorpion with a Conceal token, who is about to make a Normal move action. During that action the Operative must move within Engagement range of an enemy model, however it cannot finish that move within Engagement Range. The enemy Operative then suffers D3+2 Mortal wounds. Ouch! This represents the Scorpion running past an enemy operative, striking the enemy operative as he legs it past them.
- Merciless Strikes: You can use this at the start of the Resolve Successful Hits of the Fight action. If you had any critical hits, until the end of the combat those hits gain the Stun keyword.
I really like these techniques, and they more than make up for the lack of specialist operatives. Their is a lot to remember though, but if you can remember the right techniques at the right time, well, that could easily be a game changer.
We then move on to Equipment, and theirs a few things here you’ll be expecting, and in general feels like a nice list of stuff to purchase.
You’ve got a couple of Grenades, the Shadow-Wave Grenade (acts like a Smoke Grenade) and a Plasma Grenade (which does damage 3/4). Rune of Foresight has you picking one of your opponents Ploys at the start of the game, and should your opponent use it you gain yourself a CP.
To finish off the Blades of Khaine you have a number of Spec Ops Battle Honours, Requisitions and and Strategic Assests, of which as you can imagine, all lean in to the Aeldari way!
Killzone: Bheta-Decima
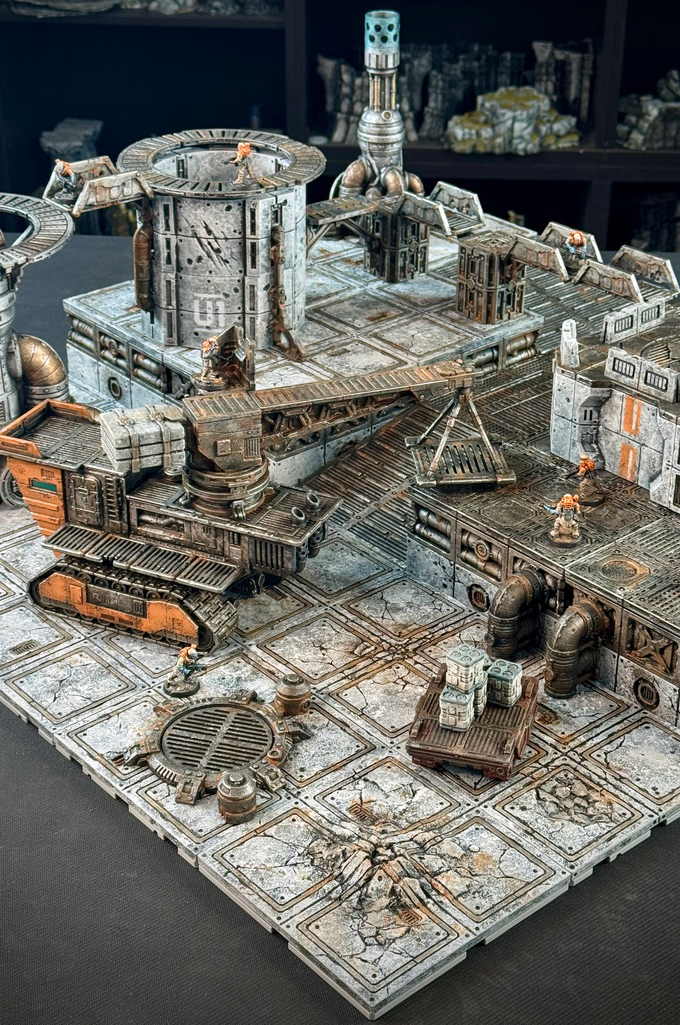
The rules for using the Sector Mechanicus scenery within Bheta-Decima is next. This explains how you’ll be able to traverse the walkways and platforms high about the seas.
It then goes in to detail regarding KIlllzone Salvation, basically for those who have picked up the separate terrain box featuring all the scenery you’ll need and the mat. It has a key for where all the scatter scenery that comes in this box will go. The battleplans appear at the end of the book, so we’ll come to those shortly.
Bheta-Decima Infiltration Campaign
This is one of my favourite parts of the book, the campaign.
It is designed to run alongside a narrative Spec Ops campaign. In matched play it can instead be used to add a further layer to your games. In both cases, the games are best run with a Campaign Master pulling the strings. The campaign utilizes a map, which can be folded out at the back of the book (love a campaign map!).
This campaign can be played with up to 6 players, each needing some form of Progress Token for the map to keep track on how you are doing (the book recommends some of the tokens found in the core set of tokens).
The rules and objectives centre around Intel Tokens. The amount of Intel Tokens and their locations in each of the games within the campaign varies depending on the number of players, however the book does show you multiple tables to help work this out. The book does however also state that the Campaign Master should be free to play around with this. The final set of tokens you will need are Hazard tokens (the book recommends Activation tokens, as you can make use of both sides (grey and orange sides showing the different stages of the hazards).
The book then clearly defines how each Campaign Round will play out:
- Movement Phase: All the players secretly note down a location they wish to move their Kill Team to on the map, This is limited to being adjacent squares or two locations away if no Hazard tokens are on either location. Players then reveal and resolve the moves.
- Battle Phase: Players then play a game of Kill Team. Any Kill Teams that have Progress tokens in the same location should fight each other. Winning players secure themselves an intel point.
- Action Phase: Players should then secretly note down a Campaign action, before everyone then reveals and resolves.
- Hazard Phase: Apply the hazard effect (a handy chart showing all of these is on the following page) to each player with a hazard token on their location. You then remove the orange hazard tokens and flip the grey ones over. Players can then place down three grey tokens each.
Each of these steps are then broken down further, further explaining how each phase is played.
Finally, to complete the campaign you have a chart to work out who the victor is based on the number of players in the campaign and how many Intel points each player has gained.
Critical Operations: Salvation Mission Pack
And finally, to wrap up the book we have the battleplans.
These all use the scenery and mat that comes with the scenery box that is also up for preorder today. It’s practically a requirement to purchase that box if you want to play through these battleplans, as whilst you may have some Sector Mechanicus scenery about, you won’t have the mat showing the hazardous areas.
I really like the layout of the scenery pieces, and the accompanying mission rules. They all seem very balanced and fun to play, with a lot more freedom of movement and different firing spots. A far cry from the confined corridors of the Gallowdark. Most of them make use of the scatter scenery from this box also.
Summary
Salvation is a great box, with two solid Kill Teams. Both back in plastic, with plenty of options. Really nice to build and paint, with fun rules to boot.
You’ve got a very solid book too, which not only contains all the rules you’ll need for said Kill teams, but also has a comprehensive set of Campaign rules, which I really like the look of and would love to run with the rest of the Sprues & Brews team.
To make best use of both the Campaign and the Battleplans from this book however, you will need to pick up the Bheta-Decima Scenery box which is also up for preorder today. This will really make a dent in your wallet/purse. I can understand why they’d do two boxes, as not everyone will want the scenery, however it is such a vital part of practically a third of the Salvation book. If my pre-Christmas funds allow for it, I’m probably going to try and take the plunge myself, as I cannot see the box sticking around for long…which is further frustrating as once that box goes discontinued, it’ll make playing the missions in here very hard to set up.
If you are thinking ‘well, I only want the Kill Teams anyway’ then that’s fine, but I’d have personally liked the option to pick everything up in one go, ideally with a bit of discount of course for having everything in the box.
Now, I need to get my Scouts finished so I can get some games on the go with them!
Our thanks again to Games Workshop for sending us a copy of Kill Team: Salvation to unbox and review, and don’t forget to use our Element Games links to help us out!

Leave a Reply