
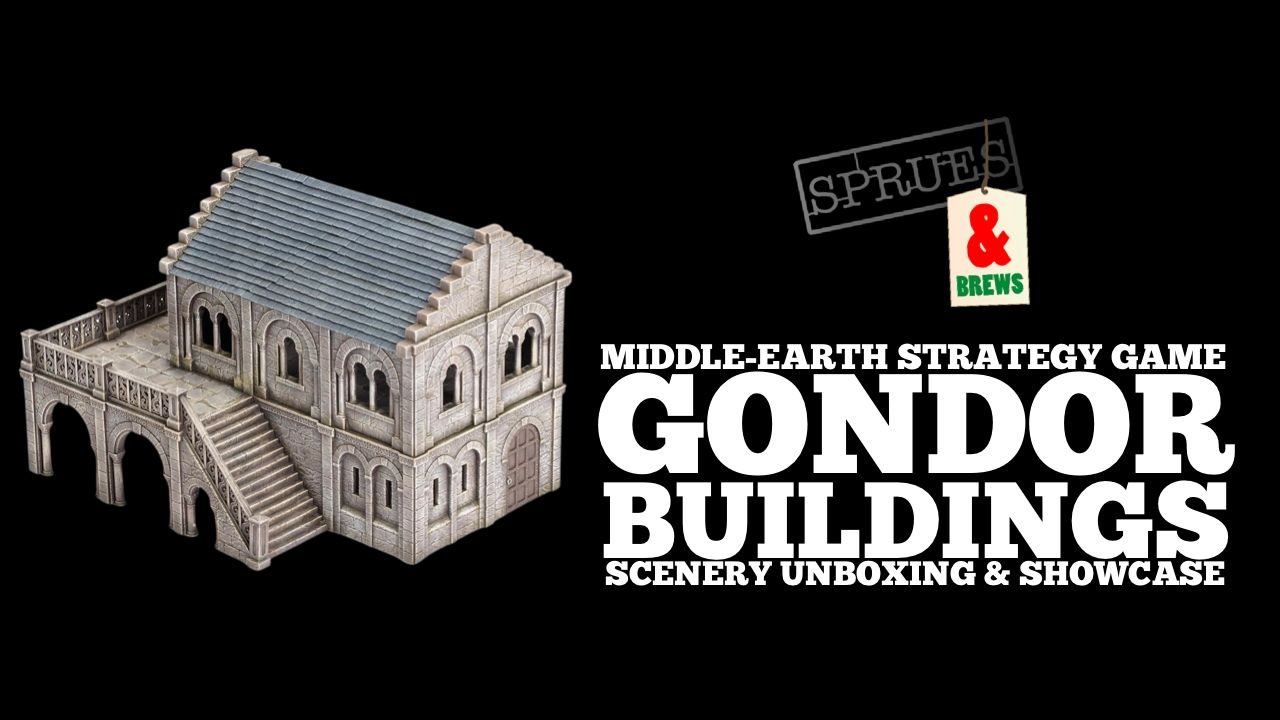
In the Lord of the Rings movies, the architecture of Gordor is gorgeous with is white stone walls and soaring towers. Well, that is until the forces of Mordor make a bit of a mess of the place! We previously saw scenery to represent the buildings of Gondor in the Osgiliath box, but today the rest of the Gondor scenery range is up for pre order – and oh what a beautiful range it is! In this post we will be unboxing the sets, checking out the sprues and building and painting the kits to see what they look like when completed. We’ve also conducted some orcish mischief and made the tower set destructible so that you can swap it from intact to damaged during your battles! I’ll also be sharing my paint scheme to get these ready for the Middle-Earth Strategy Battle Game in no time!
Massive thanks to Games Workshop for sending us over the scenery range to paint up for this article! If you would like to support the site then why not order your scenery through our affiliate Element Games and save yourself 20%
We also have a Patreon, and all support on there goes towards making more content!
I’ve filmed a full unboxing of the new scenery sets too, which you can see just below or over on YouTube!
So let’s check out all the kits!
Gondor Scenery Unboxing and Review


The new range is split over three kits, but there is a lot of interchangeability for those who want to combine multiple kits together to make large buildings!
Gondor Ruins


First up we have the Gondor Ruins, these are £30 and contain two of the frames found in the Osgiliath box – The included instructions mirror those in Osgiliath, so you will have multiple buildings of the same design if you follow the instructions and have already built those from the Osgiliath box – but the real job about this kit is that it is very, very modular. Each individual wall and floor section can be put together in numerous different ways allowing you to make everything from multiple small ruined sections to one larger building – getting multiple boxes will allow you to go even bigger, and some may want to combine this with the Manor set to make some really cool looking terrain


For the purposes of this review, I built up the parts as shown on the instructions, as this works really well for having a few areas of terrain on the tabletop. The downside to the modular nature however is build time – I’ve built and painted a lot of terrain in my years, but it did take me a while to clean and assemble each piece. The effort is well worth it however, with the best ruins kit we’ve seen for Middle-Earth
Gondor Mansion


Next we have the Gondor Mansion at £50, the most expensive of the three kits – but also a very impressive set!
This consists of 2 of the intact frames from the ruins set, but also two new sprues – one with the staircase, arches and raised walk balcony, and another with the parts for the roof. While not listed on the instructions, these also contain ruined parts which would allow you to build a damaged version of the Mansion, or even use in conjunction with the ruins kit to make a larger building or fort that has fallen into disrepair. Middle-Earth scenery designer Ray is a wizard sent here to put amazing buildings on our tabletop, and I can’t wait to see what people can do with the set.
Another really nice touch is the fact that the entire roof is removable allowing you to paint the interior and even position models inside. While deigned for the Middle-Earth SBG, I can see this being of great use during roleplaying games too!


It was really fun to build and paint up, and I’m eager to pick up another kit alongside a ruins set to build a large damaged 3 story house!
Gondor Tower


The final of the three kits we are looking at today is the Gondor Tower priced at £40. This is another ingeniously designed kit making use of three duplicate frames in order to build the structure. One really cool thing about this set is that you can build it as an intact tower (with removable done so you can place models in it) or as a ruin. However, it is very easy to make it so that you can switch it from intact to ruined during a battle, making this probably my favourite piece of the range!
In order to make it modular, first you need to follow the instructions to build it as a ruin (Don’t glue any of the shattered dome in place though). Then, find the parts that make up the damaged sections of the wall. Each is made up of two parts, and when glued together will actually pop in and out of the damaged section and hold securely in place during games.

Now build the intact roof and the parts of the ruined dome (You might want to dry fit these, then glue each part to each other, but not to the tower). There are actually locators built into the top of the structure that these will simply slot into (You can use blu-tac to hold them in place however) allowing you to switch back and forth
There’s also some elements that are placed at the bottom of the tower and inside the opening of the ruined sections to represent fallen masonry – you can clip these out, paint them up and actually store them inside the top of the tower when it is intact, and simply place them where you want them when you have it in it’s ruined setup!


From the above photos you can see that it works really well as a modular piece, and I’d recommend anyone to build it in such a way that you can swap between the two options!
Painting Gondor Scenery
As is the nature of doing reviews, I tend to have to get things painted pretty quickly in order to get them done in time for the article and video – especially with all the cool stuff coming out from Games Workshop at the moment. I’d previously painted some Osgiliath scenery for that review, so with that scheme scribbled down in a trusty notebook I went to work on getting this all painted up – something that took 4 hours from primed to completed for the entire collection.
First step was getting it primed – for this I used Colour Forge Black (though Chaos Black from Citadel would work just as well) – Priming in black meant that any missed areas in the recesses would look like shadow
Next I airbrushed all the pieces with Dryad Bark Air (Though any grey/brown will work). This ensured i had a nice surface to work from to build up the next layers. You could skip a step and prime it brown, though I feel the black in the recesses adds a little depth and a 3D feel to the bricks.
Now it’s the fun part, lots of drybrushing!
I started with a heavy drybrush of Steel Legion Drab – it doesn’t matter if you are neat here, and I put this on quite roughly and heavily, not removing much paint at all from my brush. Speaking of brushes, I used a combination of a Medium Scenery Brush from GW and a cheap makeup brush from Wilkos – this gave me a couple of different sized brushes to make sure I could get to interior detail too.
Next we continue with a heavy drybrush of Karak Stone – again don’t worry about being too neat, this all helps to get that realistic feel of stone with some colour variation across the pieces.
We now get to some “real” drybrushing – make sure to remove enough paint from your brush – my rule of thumb is that if you see paint when you run it along your hand then you still have too much on it. The secret is building this up gradually and subtly – the first colour I used is Rakarath Flesh
Next step is adding some variation to the stone work – thin some Morghast Bone or Ushabti Bone and apply it to random bricks and tiles across the model, again adding some interest to the surfaces.
Once this is dry it’s time for our last few drybrush layers – each of these needs to be lighter than the previous, first starting with Palid Wych Flesh and then a very very light drybrush of White Scar just to catch the most prominent edges and give the piece a final pop!
For the wood areas I simply used Wyldwood – this will apply really nicely over the drybrushed colours and give it some real depth. I then painted in the metal areas with Sir Coates Silver from the Two Thin Coats range (though any liver will work) then washed this with a brown shade.
For the roofing and tiles I based in Cold Corpse Blue from Two Thin Coats and drybrushed with Wolf Grey (The “Space Wolf” colours from GW will also work here”)
4 hours later I had a battlefield full of awesome new scenery!
GW are knocking out of the park with their terrain, and this is one of my favourite ranges – I highly recommend picking it up for anyone with not only an interest in Middle-Earth, but anyone who wants some more “realistic” buildings for their tabletop. I can’t wait to see what can be done when all the kits are combined together…
The Gondor Scenery Range is up for pre order today and is released Saturday 8th April
Games Workshop provided Sprues & Brews free copies for review purposes.


Leave a Reply