
Sprues and Brews fans will know that I have been working on an Imperial Fists army for the Warhammer – The Horus Heresy game over the last six months or so. The project has been a labour of love and I was really excited to be able to take it to the recent Warhammer World Horus Heresy event where I was able to play against some amazing opponents and their Traitor armies (check out our recent podcast to learn all about this awesome event!).


In this post I’ll be showcasing the entire army and will also provide a painting guide for those who may want to build and paint their own Imperial Fists army (of either the Horus Heresy or Warhammer 40,000 variety).
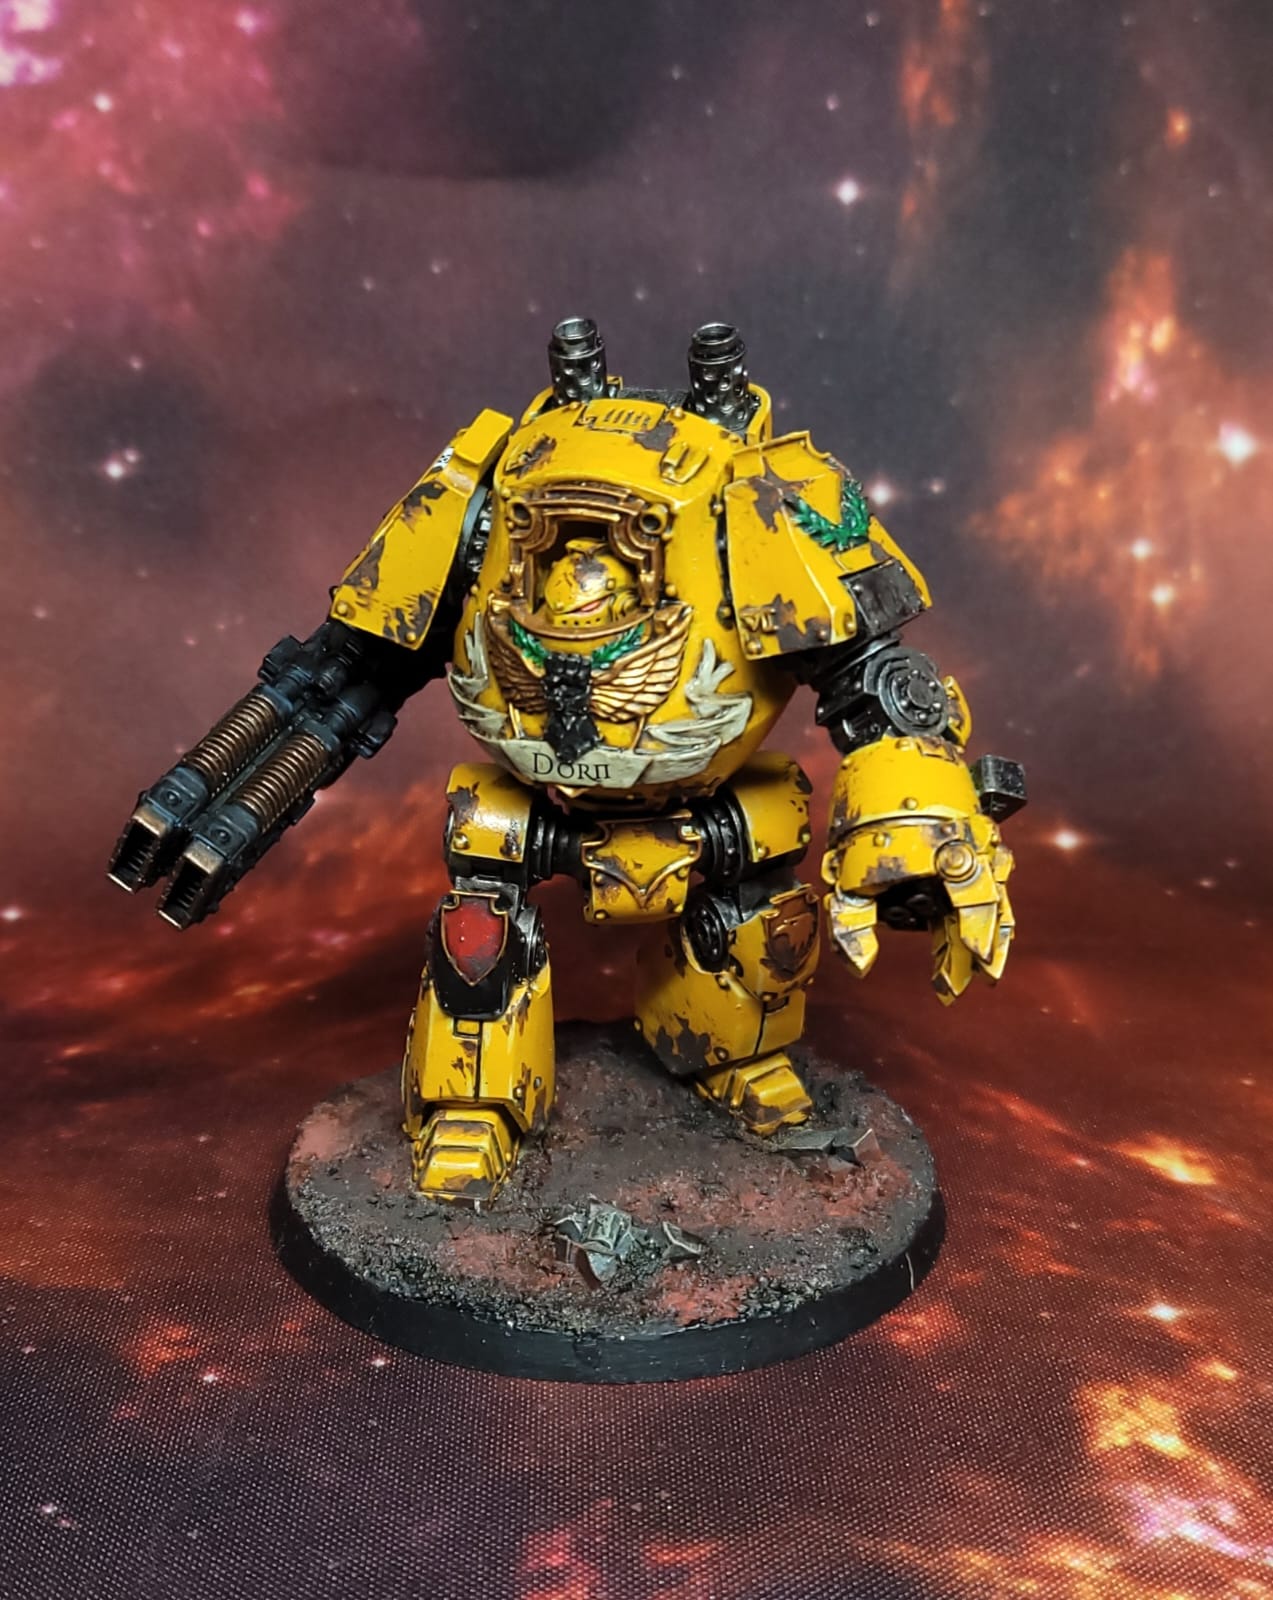
Rogal Dorn, Primarch of the Imperial Fists, the Vigilant, the Blade of the Emperor, Praetorian of Terra, the Unyielding One

One of the centrepiece models for the army, the Primarch Rogal Dorn forms a solid anchor for my army, able to hold the line against the deadliest of enemy assaults. The Imperial Fists advanced reaction, “The Best Defence”, can be used to allow Dorn to lead some brutal offensive actions of of his own!
Sigismund, 1st Captain of the Imperial Fists, Martial Champion of Rogal Dorn, Kingsbane, The Master of the Templars

There are not many opponents that Sigismund cannot match in combat and he is even able to hold his own against some of the Primarchs themselves. Sigismund often enters the battle joined to a unit of Templar Brethren and is tasked with hunting down the commanders of my Traitor opponents.
Castellan Tybus – Legion Centurian

The Castellan is the Imperial Fists unique Legion Consul option and in my opinion is an almost auto include option in any VIIth Legion force. He is a great force multiplier and grants the Line type to all Legion Heavy Support Squads in the same detachment.
Legion Cataphractii Command Squad

If you have the points spare to upgrade a regular Legion Terminator Squad in to a Command Squad I think it is well worth it. Not only does this unit have that coveted WS5 (which when equiped with Vigil Pattern Stormshields can make them very tricky to shift in combat) they also come with a Legion Standard Bearer. This model grants the unit itself the Line type and also extends a Fearless aura to nearby units. This can prove invaluable when an enemy formation deep strikes amongst your units, allowing them to hold their nerve during the subsequent pinning check and allowing them to react accordingly.
Phalanx Warder Squad


The Imperial Fists are masters of defence and no where is this more evident than with the Phalanx Warders. In the Stone Gauntlet Rite of War this squad becomes a bulwark that even your opponent’s most deadly units will struggle to shift. I have two squads in my army, one of which is converted using MKIII armour and the new Imperial Fists helmets. One of the sqauds also has a Rhino transport to help get them onto a forward objective as soon as possible.
Templar Brethren

The Templar Brethren make a great retinue for Sigismund and I often embark them in the Spartan to give them the best chance of reaching the enemy’s line in tact. Once engaged in melee they should be able to put their power swords and solarite power gauntlets to good use.
Legion Contemptor Dreadnought

Contemptors are a force to be reckoned with in games of Horus Heresy, with a wounds value, high toughness and great saves. This model is the Forgeworld Imperial Fists Contempor but I have plans to add one or two of the new plastic variety too!
Legion Javelin Squadron

Like the Contemptors, Javelins now also have a wounds and toughness characteristic making them much more effective in games. I used my pair of lascannon armed Javelins predominantly as a fast counter to enemy armour or dreadnoughts but they could also be used in a pinch to tie up enemy infantry in combat if required.
Legion Heavy Support Squad

Equipped with autocannons and an augury scanner, this unit tends to do more damage in the opponent’s turn via the return fire and interceptor reactions. Autocannons are great weapon, they have decent strength, good rate of fire and range and also have rending (6+) allowing them to even threaten enemy Land Raiders!
Legion Land Raider Spartan

A solid addition to any army, the Spartan covers multiple bases. It provides a tough centrepiece model able to bear the brunt of enemy heavy weapons fire and can also serve as a delivery mechanism for Dorn or Sigismund as required.
Legion Arquitor

I think the Arquitor is a very thematic tank for the Imperial Fists and suits their defencive style of play. Its Spiculus rocket system is a decent enough weapon which can prove very effective against large units of Legiones Astartes.
Painting the army was great fun. My normal painting style is very clean looking, with little to no battle damge and clear, bright highlights. This style of painting can mean it takes me quite a while to finish a project as there is invariably a lot of going back and tidying up mistakes etc. For my first proper Horus Heresy army I wanted to try and achieve two goals. The first was a more battle damaged, battleworn looking end result and the second was to try and speed up my painting slightly, to teach myself not to worry so much about small mistakes and instead incorporate them into the end result.
So, how did I do it? Firstly, if you want to follow along you’ll need the following paints :-
- Colour Forge Sunset Yellow Spray
- Games Workshop Averland Sunset Yellow
- Games Workshop Skeleton Horde
- Games Workshop Contrast Medium
- Games Workshop Yriel Yellow
- Games Workshop Lamentor’s Yellow Glaze
- Games Workshop Bloodletter Glaze
- Games Workshop Abaddon Black
- Games Workshop Iron Hands Steel
- Games Workshop Iron Warriors
- Games Workshop Agrax Earth Shade
- Games Workshop Nuln Oil Shade
- Games Workshop Terradon Turquise
- Games Workshop Corax White
- Games Workshop Skavenblight Dinge
- Games Workshop Rhinox Hide
- Games Workshop Mechanicus Standard Grey
To start with I base coated the models using Colour Forge Sunset Yellow spray. This can go straight down on the model but I did find it worked best to give the model a full coat, let it dry for 15 minutes and then give it a second coat. Once the model is dry I gave it a thin coat of Averland Sunset Yellow to cover up any spots I missed and ensure I have a nice consistant foundation to build from. The Colour Forge Sunset Yellow is a perfect match for the Averland Sunset Yellow.
To shade the model I used a mix of Skeleton Horde mixed about 1:2/3 with Contrast Medium. If painting a vehicle I’d focus this into the recess and panel lines only (although don’t worry too much if you’re not that neat as you can cover up mistakes in later steps). If painting an infantry model I tended to just paint this over the entire model to speed up the process. Once dry I went back with the Averland Sunset Yellow over some of the prominent areas such as shins, should pads, chest etc.
Using Yriel Yellow I applied some edge highlights to the model. On the vehicles it was quite easy to apply this to most edges however on the infantry models this was probably the most time consuming step. I learnt to focus my efforts on a few main areas (chest panel, knees and top of shins, should guards and helms) as I quickly realised that a lot of this area would be covered with mud and battle damage in a later step.
The final step to completing the yellow was to apply two coats of Lamentor’s Yellow Glaze to the entire model (make sure to allow the first coat to dry completely). Lamentor’s Yellow Glaze is out of production but I reckon some thinned down Imperial Fist Contrast will achieve a very similar end result (although I am yet to try it). Once this second coat dries you’re left with a very rich yellow colour.
The next step to is to block out those areas such as the shoulder pad rims on your infantry and one or two panels on your vehicles in Abaddon Black. Also pick out the bolters and weapon casings too. Once dry you can apply an edge highlight using Skavenblight Dinge but again, don’t worry about being too neat during this step, you can even drybrush it on to speed this step up should you wish. With the black finished you can now apply some silver to weapon barrels, armour joints etc. Once dry I applied a wash of 1:1 Agrax Earth Shade and Nuln Oil to these areas.
At this point we’re almost ready to start applying the battle damage effects. FIrst though you’ll want to paint the eye lense of your helms using Corax White. Once dry you can use the Bloodletter Glaze thinned with some water over the top to create a subtle red glow effect. Again this glaze is no longer in production but I’m sure one the red contrast colours would work fine as an alternative. You’ll also want to apply any transfers at this point too.
At this point the model could be considered complete and battle ready. There is no need to apply any of the battle damage effects below if you do not wish too. Just base the model (I used a combination of sand and textured paint) and you’re good to go. To base my models I used a base of Rhinox Hide drybrushed with Mechanicus Standard Grey over which I painted patches of Nuln Oil and Typhus Corrosion in an attempt to create a battle ravaged industrial warzone effect.
Should you wish to add a battleworn effect to your model it’s really simple. First you’ll want to work on the black areas. On the vehicles I applied some Iron Warriors to various locations across the model using a sponge to lightl applu the paint using a dabbing motion. I focusses on areas that would see a lot of wear, such as around access hatches or the track areas, but also applied a little bit to other surfaces (including over transfers) as well. On some of the black panels I also applied a few scratch effects using a brush (although to be honest I think I went a bit overboard here myself- less is more). On the infantry you can use the same technque using Iron Hands Steel over the black should pad rims and weapon casings. Be very careful to only apply a small amount, very lightly dab the sponge. The end effect should be a subtle scuffed look on parts of the armour rather than turning the entire thing silver.
I then used an old brush to apply some Typhus Corrosion sparingly across the models. I tended to focus on areas such as the gaps between armour panels, or around the track areas of vehicles where dirt and mud would naturally build up but I did also apply some across other surfaces too. A good tip is apply some across any transfers but make sure not to cover them up entirely – the end effect looks quite cool I think. Don’t forget to apply some over the black areas as well. If you made any mistakes earlier in the process you can cover them up too with some Typhus Corrosion! Typhus Corrosion has a slight gritty textured finish so make sure you use an old brush to apply it and feel free to apply a couple of coats to really build up that gritty mud like finish.
With that final step the model is finished. It took me about a week to paint each individual unit (spending on average 3 or 4 nights painting). Overall I’m quite happy with the end result and I think I achieved my initial goals. Being able to cover up earlier mistakes with the battle damage really did speed up the process without compromising the end result. That said I do think I have plenty of room for improvement and with my next project I want to try and refine the battleworn effect a bit and try and make it look much more realistic and gritty.
I hope you enjoyed the guide, please get in touch over on Twitter or Facebook if you have any comments or feedback.


Leave a Reply