
The Seraphon are on their way so what better time is there to either start a new army or add some celestial reinforcements to your existing collection!
The Seraphon have a very striking colour scheme, the bright turquoise blues, oranges and greens make for a fantastic looking collection when arrayed for battle. They offer a unique painting challenge for the hobbysist with lots of different textures, colour combinations and a variety of different model types, from stomping Stegadons to slinking Skinks!
I expect there are a fair few readers who are currently contemplating their first foray with the Seraphon so I wanted to share with you my very easy method of painting a decent looking Seraphon army in a week! Yes you read that right, a week!

Now most people who know me also know that I am not the world’s quickest painter. It often takes me many months to finish an army – I tend to get bogged down in the detail work and even a single unit can take me several weeks to finish.
Back in June 2019, Sprues and Brews embarked on an amibitious challenge! Games Workshop had just released their Contrast Paint Range so we decided to put them to the test and challenged ourselves to paint a full 1K army in a week!
I have to admit, I did not think this would be possible (especially for a painting sloth like myself), but as you will soon see, not only did I complete this challenge but I think I actually achieved a pretty decent tabletop finish too.
So, part one of the challenge was to build a 1k army. I decided to build a Seraphon army as I felt the different textures of the models would work really well with the Contrast paints. With this decision made I set about building the following units :-
- A Saurus Oldblood
- A Skink Starpriest
- 20 Skinks
- 3 Ripperdactyls
- A Stegadon
- A Bastiladon
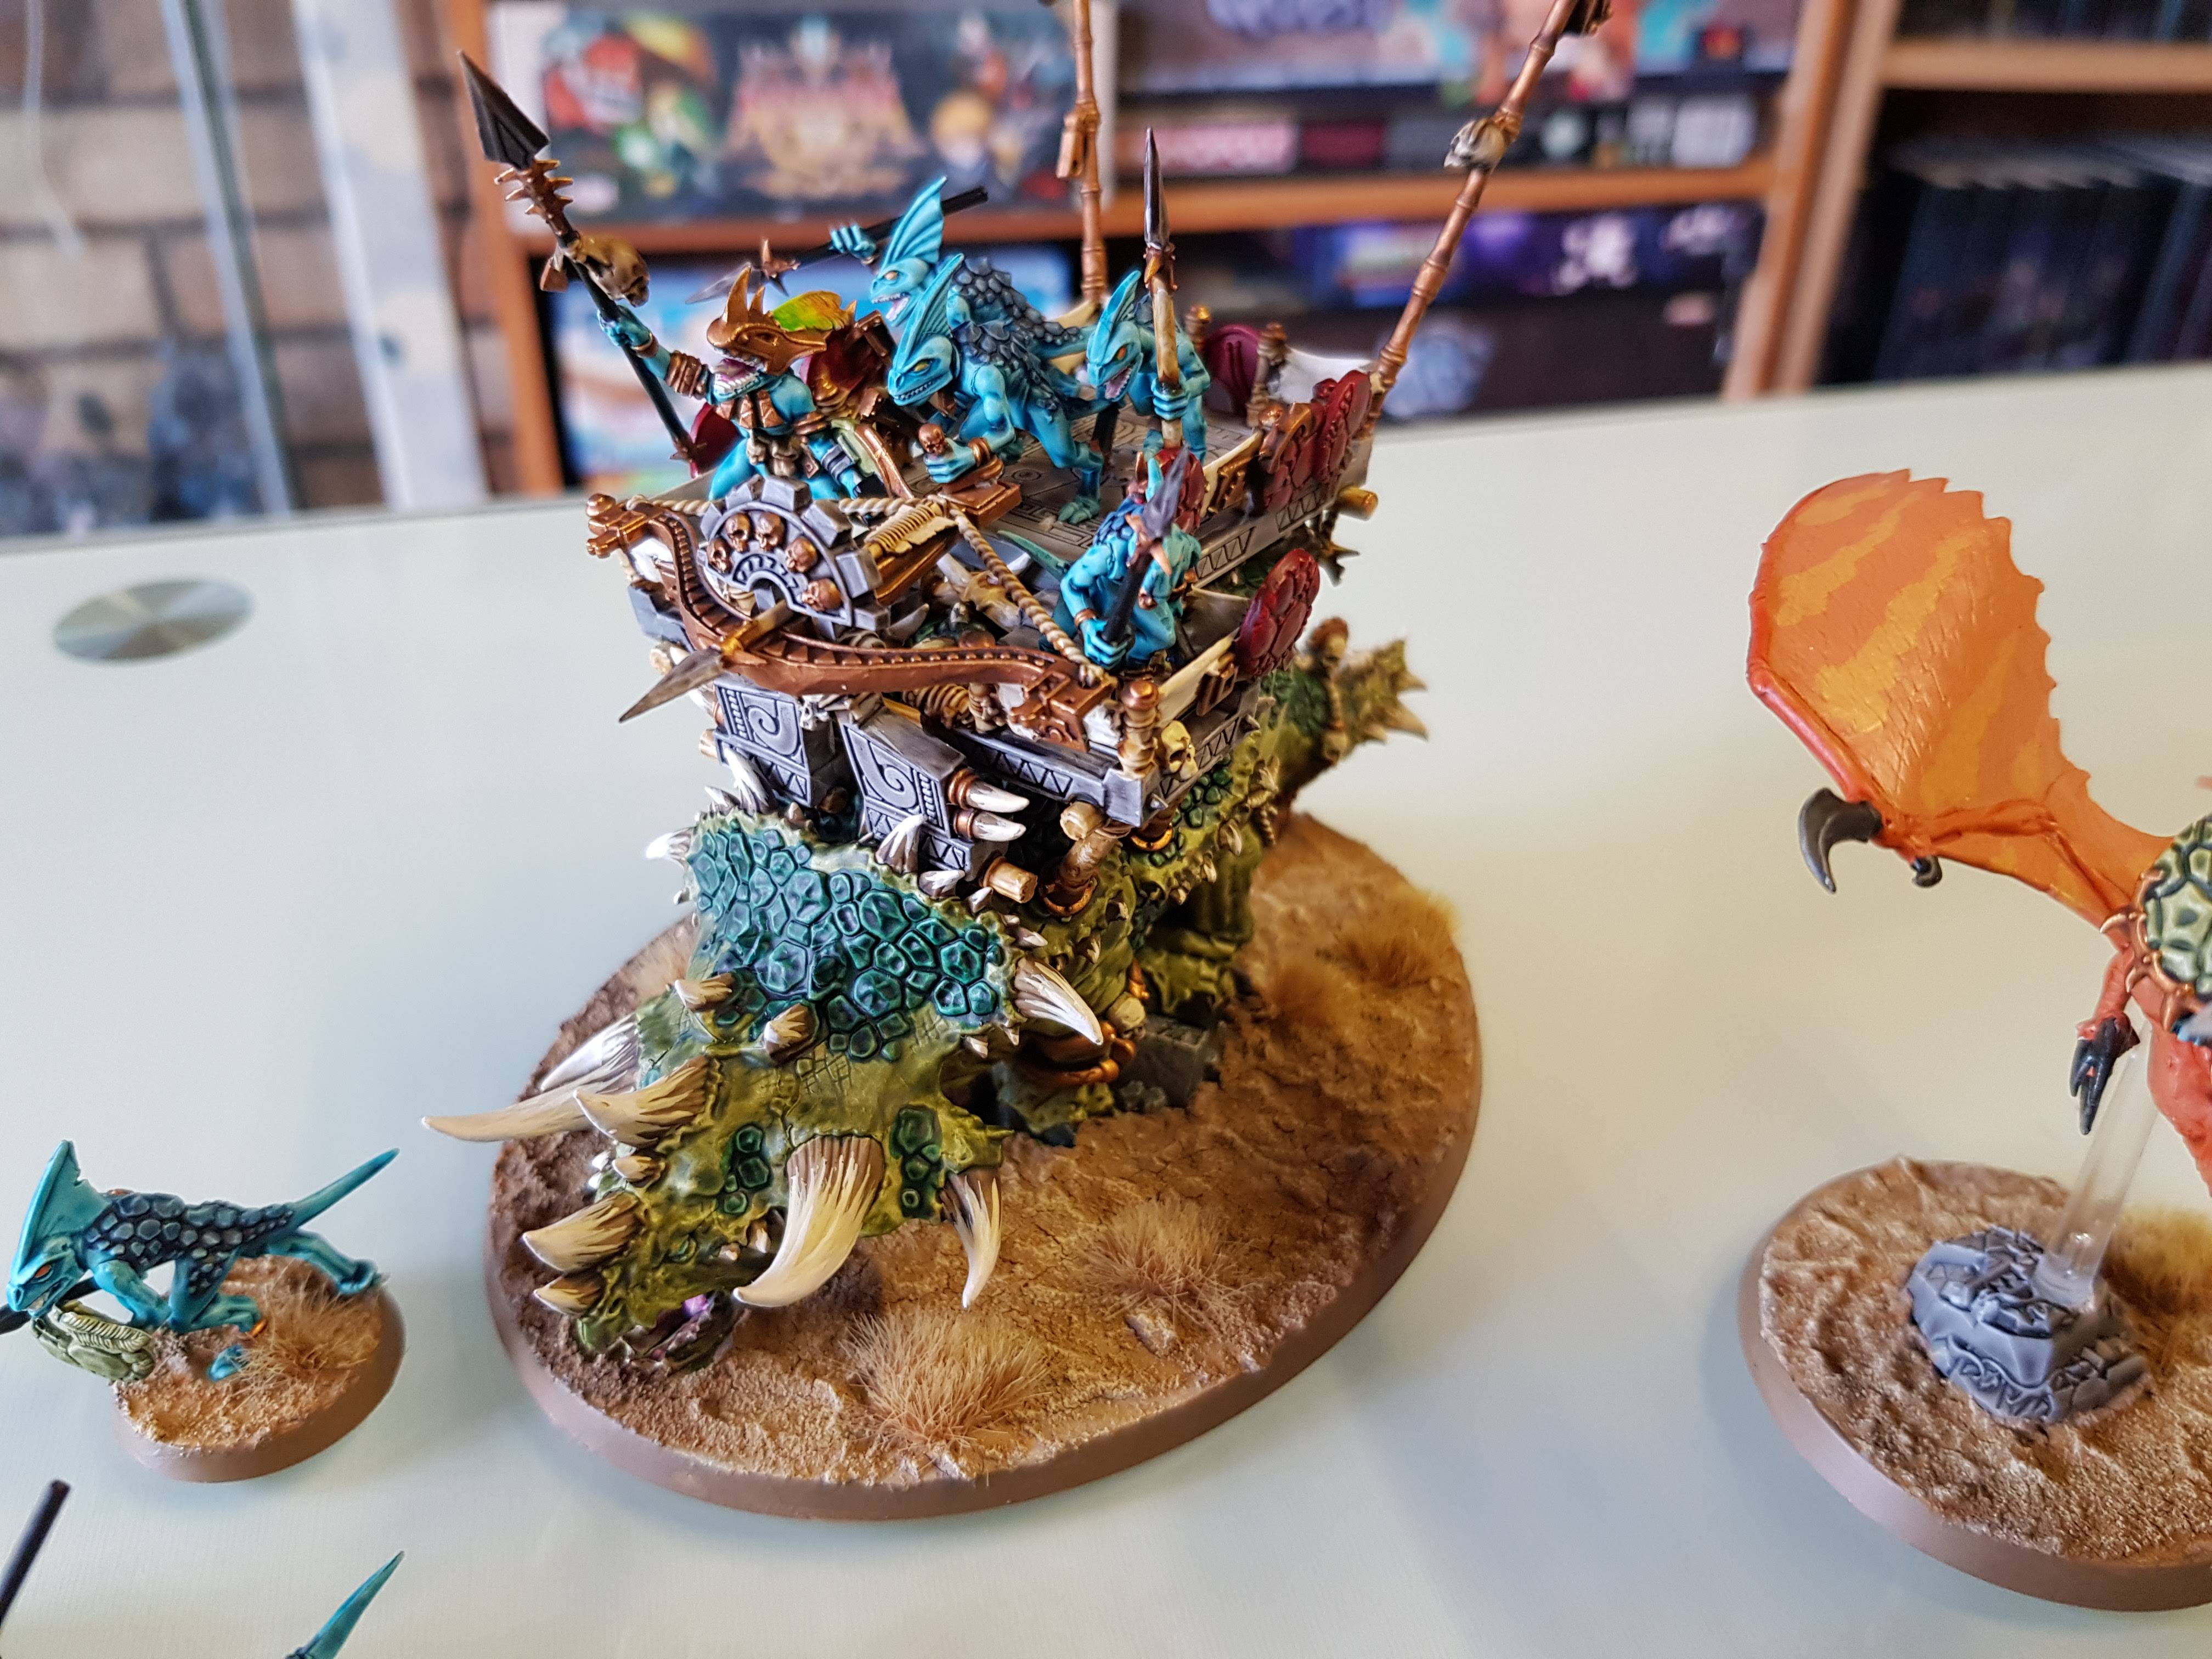
Models built, now it was time to decide on a colour scheme. This was an easy decision, I decided to try and follow the box art as close as possible. I really love the Games Workshop colour scheme for the Seraphon and if I could achieve a similar look with Contrast paints I would be very happy.
I set to work on the Skinks first. I based them in Wraithbone Spray (I prefer the warmer base colour to the Grey Seer spray). Once this was dry I covered the whole model in an Akhelian Green and Contrast Medium mix (about 1:2 mix). This formed the nice turquoise blue colour and matched the box art pretty well. The benefits of Contrast paint was quickly apparent as I did not have to worry about shading or highlight the skin.
With the skin done, I then started working on the scales on the backs of the models. For this part I used Leviadon Blue and Contrast Medium mix (about 1:1 mix) straight over the top of the Akhelian Green. Again no further shading or highlighting was required.
With this stage done, the majority of the Skink model was finished. I was very happy with how closely they matched the box art.

To finish the Skinks off, I used a drop of Iyanden Yellow to paint the eyes, a Volupus Pink and Contrast Medium mix (about 1:3 mix) for the tongues and inner mouth. I left the teeth wraith bone (I went back and just tidied them up a bit where required).
I then used my first non-Contrast paint of the challenge, good old Abbadon Black. This was used to paint the javelins. The stone tips were painted with a Basilicanum Grey and Contrast Medium mix (about 1:1 mix).
Next up I painted all Skink shields. These I painted using a Militarum Green and Contrast Medium mix (about 1:1 mix). At this point I was becoming more and more sold on the whole Contrast paints idea – the shields came out great and once again I did not have to do any shading or highlighting saving me tonnes of time!

Finally I painted all the gold jewelery using Retributer Gold washed with Agrax Earthshade to give it that ancient golden look.
Skinks finished!

I used the exact same recipe and technique to paint the Saurus Oldblood, Skink Starpriest and all the Skink riders and crew.
Note : The Saurus Oldblood shield was painted using just Flesh Tearers Red Contrast paint straight out of the pot 🙂


Well, at this point in the project I was two evenings in and I’d spent about 6-7 hours working on the project. The next day I decided it was time to tackle one of the big dinosaurs, specifically the Stegadon!
I started with a small experiment on a bit of of unused sprue to test my recipe for Stegadon skin.

I used a Wraithbone base again and then applied Militarum Green and Contrast Medium mix (about a 1:1 mix) all over the model. This stage was quite messy as the model is quite large, I was very careful to avoid the paint pooling too much on parts of the model.
Once this was dry I then painted the bigger scales in a darker green, aiming to mirror the box art as closely as possible. To achieve this I uses a Terradon Turquise and Contrast Medium mix (about 1:1 mix) applied straight over the previous layer. Wow! I was really impressed with the highlighing effect that was created for so little effort!

With the bulk of the model completed, I then used some regular paint (Zandri Dust, Ushabti Bone, Screaming Skull) to paint the horns and spikes and then painted the gold details using the same recipe as I used on the Skinks. The mouth was also painted using the same recipe as above.

Not bad for an afternoon’s work! With the Stegadon finished I spent the evening painting the howdah itself. This was a bit fiddly as there are several different components (the stone howdah, the shields, the wooden stakes, the fabrics and the great bow) so there was quite a bit of downtime between colours as I waited for each to dry. I’ll quickly breakdown how I painted these components :-
- Stegadon howdah : Basilicanum Grey and Contrast Medium mix (about 1:1 mix)
- Stegadon fabrics : Zandri Dust, Agrax Earthshade, Screaming Skull
- Stegadon wooden stakes : Snakebite Leather and Contast Medium mix (about 1:1 mix)
- Stegadon shields : Flesh Tearers Red straight out of the pot
- Stegadon gold details : Retributor Gold, Agrax Earthshade wash
At the end of the evening, the Stegadon was finished! It took me a single day to paint a model which would ordinarily take me several weeks to complete!

I really enjoyed painting the Stegadon, so I decided to paint another dinosaur next, the Bastiladon!
I had a good idea of how I wanted to paint the softer underbelly of the model, so after a quick test on some old sprue I went straight to it. Using Guilliman Flesh contrast paint straight out of the pot I quickly got this part of the model completed.

Next up I tackled the carapace using Dark Angels Green contrast paint straight out of the pot. I actually applied a few coats of this to the extremes of the carapace to create that dark mottled effect you can see in the image below. Once it was all dry I used a some Lamenter’s Yellow Glaze to glaze the entire carapace and add a bit more brightness to the model.

Once this was dry, all that was left to do was paint the Solar Engine itself using Retributor Gold and Agrax Earthshade. The big crystal was painted using an Iyandon Yellow and Contrast Medium mix (about a 1:2 mix).

The army was really starting to come together now, all I had left to finish was the Ripperdactyl unit. I started by painting the entire model with Jokero Orange. Once this was dry I used Gryph-Hound Orange contrast paint straight out of the pot to give the body and arms (but not the wings) a ‘wash’.
I then painted the ‘triangle’ looking patterns onto the wing using just Tau Light Ochre.

I used Black Templar contast paint straight out of the pot to paint the claws and talons and a drop of Aethermatic Blue contrast paint to paint the eyes. The mouth was painted using the same recipe as that used on the Skink’s mouths.

I was satisified that the end result matched the box art well. All that was left now was to base the army and for this I used the following recipe :-
- Agrellan Badlands
- Cassandora Yellow
- Drybrush Tyrant Skull
- Steel Legion Drab (for the base rims)
With that, the Contrast Painting Challenge was complete and I am very satisifed that I managed to achieve a good table top standard so quickly. There are some more pictures of the completed army below, I hope you have found this article useful 🙂


Leave a Reply