
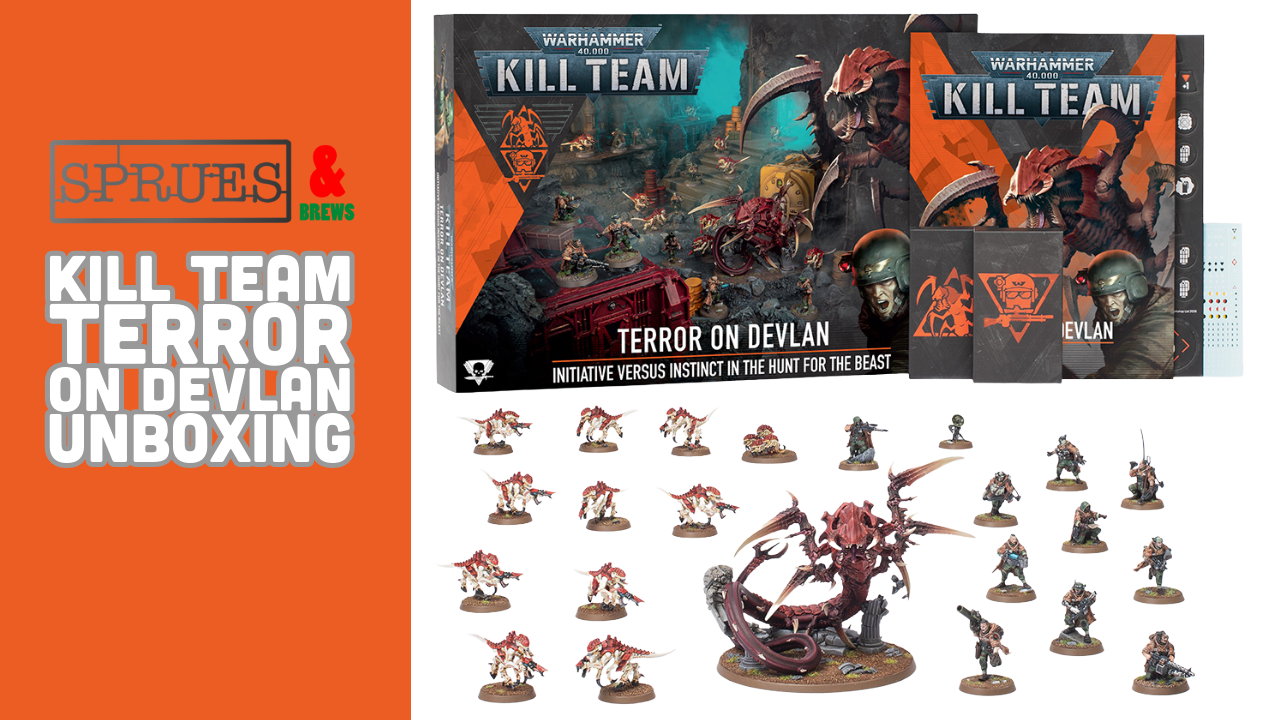
The current edition of Kill Team rolls on, and we have been lucky enough to be sent the brand new expansion, Terror on Devlan, to unbox and review.
So far, this edition of Kill Team has been my favourite, due to the rules changes and the quality of the expansions that have arrived since Volkus hit the shelves in Hivestorm.
So, it goes without saying that I was super excited when I was given the opportunity to review this latest box, which pits the Astra Militarum’s Spectre Squad against a fearsome (returning) Red Terror of the Tyranids.
In this article I’ll take you through the main dossier/rule book, as well as showing off the brand new minis in the box.
Our thanks to Games Workshop for sending us this box to unbox and review. As always, you can help us out by preordering your box through our affilates over at Element Games. Not only will you snag a saving on your Warhammer goods VS RRP, but you’ll also be helping us out too. Win Win!
Let’s get going!
Unboxing Terror on Devlan
First things first, let’s get this box opened. You can check out our unboxing video below:
You get a bunch of cool things in here:
- Spectre Squad sprues
- Red Terror sprues
- Termagaunts sprue
- Terror on Devlan Dossier (Rulebook)
- Spectre Squad Cards (Datacards and Ploys)
- Tyranid Cards (NPO Datacards, Ploys and Activation cards)
- Token Sheet (one sheet with all tokens)
- Assembly Instructions
It’s important to note that you will require the base Kill Team box for this, as you’ll need both the rules and the Volkus scenery set to play.
Spectre Squad
I have a large Astra Militarum (still Imperial Guard in my heart…) army, so I’m also excited when a new unit appears.
The Spectre Squad, as you can tell from the look of the unit, are an infiltration/recon unit. Whereas the Kasrkin are basically an elite SWAT team of veterans, the Spectre Squad are your sneaky sneaky unit, with a similar look and feel to Gaunt’s Ghosts.
Let’s check out the sprues first:

You don’t get a lot of interchangeable parts here, but you do get a couple. The biggest one being the choice of weapon for your Gunner. I opted for a Plasma Gun, however you could choose a Meltagun instead.
The models went together super easily, however do watch the cloak on the Sharpshooter, as the cloak fit together perfectly, but then a gap appeared on mine as the glue dried. Probably my own fault, but a heads up anyway!
I really enjoyed painting them. I opted for a Contrast approach, leaning into how I paint my Guardsmen.


We’ll check out the unit’s Kill Team rules shortly when we look into the book.
The Red Terror
We move on to the big beasty in the box, The Red Terror!
He wasn’t too bad to assemble, however do take your time when building his tail. Don’t rush it. Also watch when you are putting the little spikes on his tail too.
Once assembled though, he is an awesome looking model, and has inspired me to build and paint some more Tyranids!
You can check out the sprues below:

I really enjoyed painting up the model, and you can see my work below:

Rules | Kill Team Spectre Squad
Within the book you’ve got the full rules for the Spectre Squad so that you can field them in games of Kill Team.
First let us take a look at the step up of the Kill Team. You have to take a Veteran Sergeant and a Vox Beacon. You can then choose 9 Operatives from the following list:
- Field Medicae
- Grenadier
- Guide
- Gunner (with either a Meltagun or Plasma Gun)
- Heavy Gunner
- Loader
- Sharpshooter
- Stub-Gunner
- Trooper
- Vox-Operator
You can only select each Operative the once, aside from the Trooper Operative.
As you can imagine from the makeup of the unit, the Spectre Squad has the Recon and Infiltration archetypes.
The Kill Team gets two Faction Rules. The easiest one to explain is the Camo Cloaks. If you can retain any cover saves, you can retain one additional cover save, or you can retain one cover save as a critical success instead.
We then have the Elite Fieldcraft rule. This is very cool. It’s quite wordy, but in short it allows you gain Fieldcraft points, which you can spend to interrupt enemy operatives performing an Action which has the Engage token. This allows your operative to perform a free Shoot, Dash or Reposition order (so long as the Operative is ready and isn’t in combat range of an enemy operative
Some slight caveats, you cannot interrupt each enemy operatives activation more than once per activation and each friendly operative cannot perform more than one free action per turning point as a result of this rule.
The rule further breaks down how it’s used depending on what you are interrupting.
This is one of my favourite Faction rules for a Kill Team. It feels very thematic and is a lot of fun to get to grips with.
As with all Kill Teams you get a selection of Firefight and Strategy Ploys. I’ve picked out a couple of my favourites below:
- Dodge: During a friendly operative’s action you can Fall Back from 1 less AP
- Disappear: One friendly operative immediately makes a free Reposition move, but cannot end closer to an enemy operative or the enemies drop zone
- Patience: In the Firefight phase of the turning point you can do one of the following. When it’s your turn to activate an operative, you can choose to skip that activation (you cannot do this until after your opponent’s first activiation) or when a friendly operative performs a shoot or fight action during it’s activation, should it be the last operative in this turning point it’s weapons have the Relentless weapon rule.
We are going to look at the datasheets for the operatives next, and theirs a lot of cool additional rules dotted throughout the Kill Team. They certainley play into the playstyle where you pick and choose the firefights to get into, using terrain and movement schenigans in order to accomplish your goals.
I’m going to pick out some of my favourite bits from the operatives, but make sure you check out the video above for a peek at all of them:
- Veteran Sergaent: You can select one friendly operative who has already been used in the turning point, nor have they interrupted an enemy operative using the Fieldcraft ability. That operative can now interrupted.You cannot Reposition however if you already have done so earlier in the turning point.
- Grenadier: Has Proximity and Melta mines
- Heavy Gunner: So long as a Loader operative is within this models control range all profiles on the missile launcher have the Heavy (Dash only) weapon rule instead of the Heavy weapon rule until the end of the activiation.
- Loader: Whenever a friendly operative is within the control range of this model, then the friendly operative can re-roll one of the Attack dice. Furthermore, for 1AP you can select a friendly operative within this model’s control range and get a free Shoot action, so long as nether model is within control range of an enemy operative.
- Vox-Operator: For 1AP can give another friendly Operative +1 to it’s APL stat
- Vox-Relay Beacon: 1AP grants the Signal ability, which allows you to choose a friendly operative within 6″. The operative gets +1 to it’s APL stat.
You’ve got a couple of cool Equipment options, including Starshell Flare (a free Stun Grenade that doesn’t take up an Action) and Tvid-Feed Triangulation (removes obscured status from an enemy operative).
The following page is the Designer’s Commentary, which I always recommend reading as it gives you a really good breakdown on how your Kill Team will perform in games. As you’d imagine it drills home that this Kill Team is all about mastering movement, picking and choosing your targets and moments, and the ability to respond to what your opponent is doing.
I can imagine this Kill Team taking a few games to really get to gripes with, but I sense you’ll have a lot of fun in the process.
Joint Ops: Terron on Devlan Mission Pack
So within these books you tend to get a mission pack for Joint Ops (basically your play against the computer mode) and a more traditional set of missions for playing against an opponent.
Not so with this book, as it only contains the one mission pack, and that is a Joint Ops one.
As you may imagine, the mission pack focuses on fighting the Tyranids. As you progress through the missions you encounter the big bad Red Terror in a final battle for the ages.
The Mission Pack includes 9 missions, with a printed handy progression chart, as you work your way through the missons.
All of the datasheets are here for your NPOs (None playable characters, in this case the Termagaunts, Rippers and The Red Terror) as well as cleverly thought out Behaviour reactions. You actually get a very handy set of activation cards for your Tyranids in the box.
As you’d imagine the most interesting datacard here is The Red Terror, who actually gets two. He has a datacard for when he is Hunting, and one for when he is lurking. When he moves, he can use the Burrow move to simply reappear elsewhere on the battlefield. The book explains how the Behaviour of the Red Terror changes as he flicks between Hunt and Lurk modes.
Again, you can check out the datacards in full in the above video.
The 9 included missions all look fun, and make the most out of the NPOs and terrain. Important to note you only need the Vokus scenery to play through this mission pack, you do not need the Tomb World set.
Summary
Make no mistake, the models in this box are superb. In games of Kill Team the Spectre Squad have really thematic and fun rules, with an excellent pair of Faction rules. I cannot wait to try the unit out in a game.
The Red Terror is also a superb model, with really fun NPO rules. Really hope the model is terrifying in 40k too when his rules drop.
This is a NPO-driven box thanks to its model contents, and the book reflects that with just the one Mission Pack. However, it’s a very well written mission pack, with clear mission progression and well structured missions. The Red Terror looks as frightening to play against in Kill Team, but not impossible to bring down.
It’s a shame they couldn’t sneak in some traditional player vs player content in here, but it makes sense why it was left out, as it wouldn’t really have fit the contents of the box.
All in all, impressed with the box. It’s the biggest push I’ve had so far to set up a Joint Ops game on my gaming table. In fact, let’s crack open that Volkus scenery box…
Our thanks again to Games Workshop for sending us this box.


Leave a Reply